Django Basics for a Beginner
Published on March 23, 2023
This blog will give you knowlege of some basic things that a beginner should know before starting web development using django.
Django Control Flow Structure
Django is s a high-level Python web framework. You might ask, what is a framework? “A framework is a software framework that is designed to support the development of web applications including web services, web resources and web APIs.
Alright you now know the meaning of a web framework. Now another question arises, why do we need a web framework? " A web framework is a server-side application framework which is designed to support the development of dynamic websites. ". By using a web framework, you won't have to handle the complexities of web development and it's inner details. Therefore, it makes the process of creating a website much easier as the developer don't have to program everything from the scratch.
There are various web development frameworks available in the market. Some of them are listed below:
- React JS, Angular, Vue, Django and many more.
Django is that it is built on python. It follows the DRY rule, which means “Don't Repeat Yourself”. As the name says, this rule is all about keeping the code simple and non redundant. Some advantages of using Django are:
- It takes care of user authentication, content administration, site maps.
- Django is highly secure. It helps the developers to avoid many common security mistakes, such as SQL injection, cross-site scripting, csrf/ xsrf (cross-site request forgery) and click-jacking. Its user authentication system provides a secure way to manage user accounts and passwords.
- It’s scalable. (Example: Instagram, Disqus). Django uses a “shared-nothing” architecture, which means you can add hardware at any level database servers, caching servers or Web/application servers.
- The framework cleanly separates components such as its database layer and application layer. And it ships with a simple-yet-powerful cache framework.
- Django is very versatile it can be used to create content management systems, social networks to scientific computing platforms etc.
- Django is also a high level, MVT architecture based.
- It has various other advantages as it has an automatic administration interface, Object-relational mapper (ORM), RSS feeds and many more.
Let's dive into the working of Django.
Django Architecture
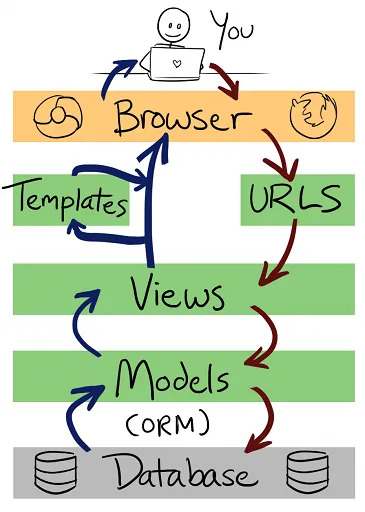
Django follows the MVT (Model View Template architecture ) which is based on the MVC or (Model View Controller architecture). The main difference between these two is that Django itself takes care of the controller part.
MVC stands for _Model View Controller_. It is used for developing the web applications, in this the code is broken into various segments. There are 3 segments, they are:
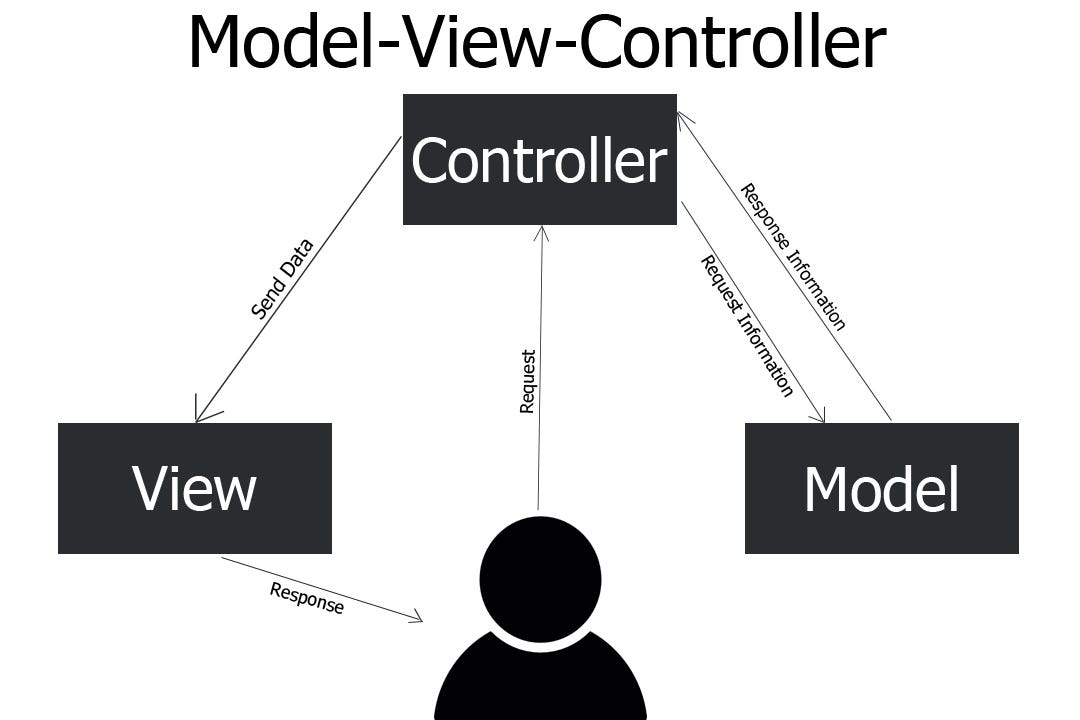 Model: Model is used for storing and maintaining your data. It is the backend where your database is defined.
Views: View is all about the presentation and it is not at all aware of the backend. Whatever the user is seeing, it is referred to a view.
Controller: Controller is a business logic which will interact with the model and the view.
Now that we have understood MVC, lets learn about Django MVT pattern.
MVT stands for Model View Template. In MVT, there is a predefined template for user interface. Using this template, you don’t need to rewrite the code again and again!
Now you might be wondering where is the controller?
The controller part is inbuilt in Django. That is, it’s probably the framework itself: the machinery that sends a request to the appropriate view, according to the Django URL configuration.
So, in the case of Django, this is what each component is doing:
- The MODEL helps to handle database. It is a data access layer, which contains the required fields and behaviors of the data you’re storing. There’s hardly an application without a database. A model is a Python class, and it does not know anything about other Django layers. Models help developers to create, read, update, and delete objects (CRUD operations) in the original database. Also, they hold business logic, custom methods, properties, and other things related to data manipulation.
- The VIEW is used to execute the business logic and interact with a model to carry data and renders a template. The view fetches data from a model. Then, it either gives each template access to specific data to be displayed, or it processes data beforehand. It accepts HTTP requests, applies business logic provided by Python classes and methods, and provides HTTP responses to the client requests.
- The TEMPLATE is a presentation layer that handles the User Interface part completely. These are files with HTML code, which is used to render data. The contents of these files can be static or dynamic. A template is used only to present data since there’s no business logic in it.
The ‘controller’ here is Django itself which sends the request to the appropriate view in accordance with the specified URL. This is why Django is referred to as MTV rather than MVC architecture.
The developer provides the model, the view, and the template, then maps it to a URL, and Django serves it to the user.
In short, a web application has data, layout, and logic. The model will work with the data, the view will work with the logic, and the template will work with the layout.
Let’s consider a simple overview of Django MVT Architecture
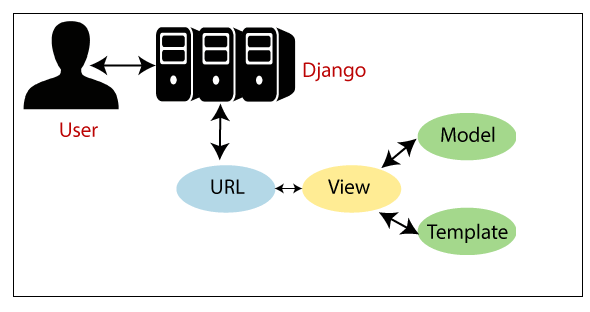
Template is the front end. Templates interact with the views. The Model servers as a backend. Then View will access Templates and Models and maps. View maps the template to a url and Django works as a controller and serves the Templates to the user.
Understanding The Project File Structure
For creating a web application, make sure you have python and django installed. Then, to create a project, run the following command:
django-admin startproject myproject
 Here
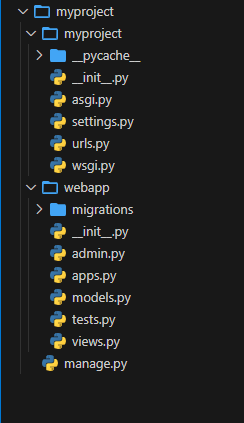
Here myproject is the name of the project and it can be named as anything you want. Now you project is created, there is a list of files inside the project directory. Let’s understand them.
manage.py: It is a command-line utility that lets you interact with this Django project in various ways.
myproject/: It is the actual Python package for your project. It is used to import anything, say myproject.urls.
init.py: Init just tells the python that this is to be treated like a python package.
settings.py: This file manages all the settings & configuration of your project.
urls.py: This is the main controller which maps it to your website.
wsgi.py: This is an entry-point for the web servers to serve the project you have created. It serves as an entry point for WSGI (Web Server Gateway Interface) compatible web servers. It describes how a web server communicates with web applications, and how web applications can be chained together to process one request.
It is used to forward requests from a web server to a backend Python web framework. From there, responses are then passed back to the web server to reply to the requestor.
Requests are sent from the client’s browser to the server. WSGI forwards the request to the webserver python app, which then returns the completed request back to the webserver and on to the browser
Note that to create your application, make sure you are in the same directory as manage.py and then type the below command:
python manage.py startapp webapp
 Here
Here myproject is the name of the project and it can be named as anything you want. Now if you look at the webapp directory, you have some extra things from the original myproject. It includes model, test which are related to your backend databases.
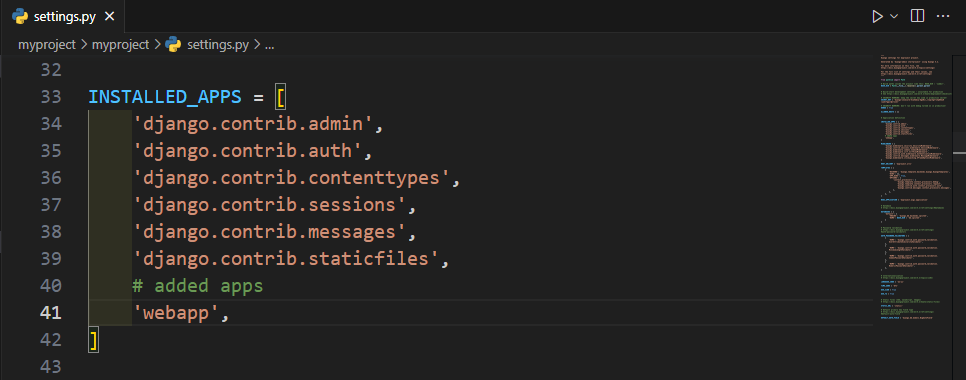
Next, you need to import your application manually inside your project settings. For that, open your myproject/settings.py and add your app manually by typing webapp in the INSTALLED_APPS
Creating a View: Open your webapp/views.py and put the given code in it:
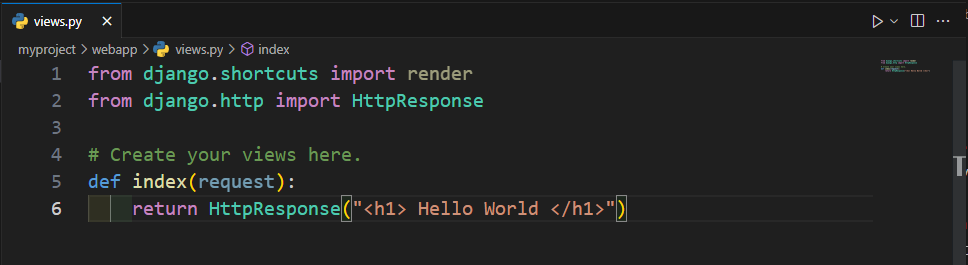
In the above code ,you created a view which returns httpResponse. Now to map this view to a URL. You need to add URLconf in your application. So create a new python file urls.py inside your webapp. In webapp/urls.py include the following code:
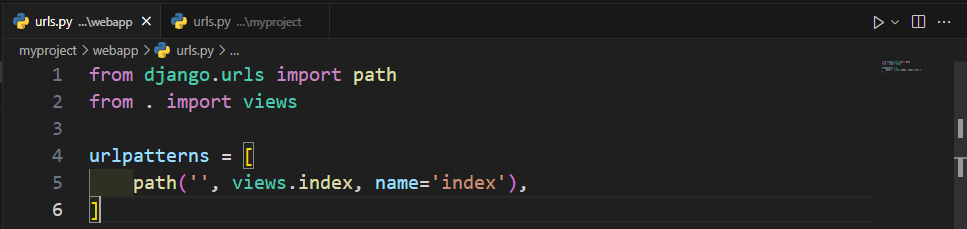
Url Mapping: In the above code, you referenced a view which will return index (defined in views.py file). The next step is to point the root URLconf at the webapp.urls module. Open your myproject/urls.py file and write the below code:
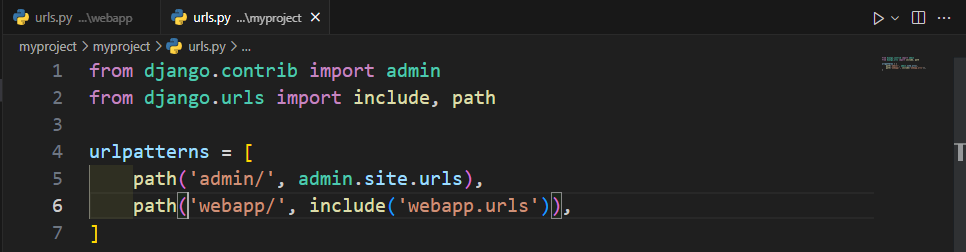
The include() function allows referencing other URLconfs.
Note that there is a trailing slash, this means whenever Django encounters include(), it chops off whatever part of the URL matched up to that point and sends the remaining string to include URLconf for further processing. Coding part is completed. To start the server, type the below command:
python manage.py runserver
After running the server, go to http://localhost:8000/webapp/ in your browser, and you should see the text “Hello World”.
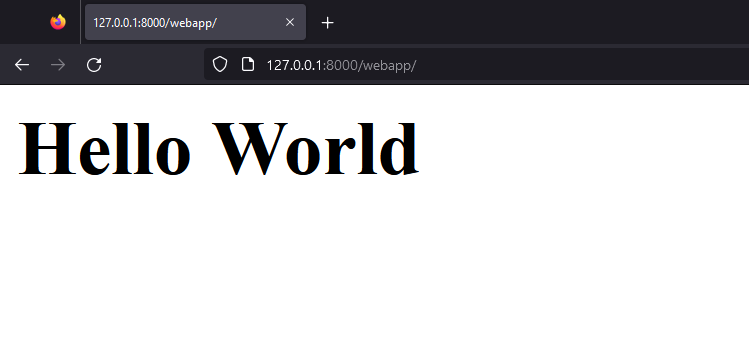
Congratulations! You have successfully created a basic “Hello World” Web App.
Let's understand a bit more about the rest of the files in your website directory.
First, you need to create a ‘templates’ folder inside the
rootdirectory and inside thetemplatesdirectory, create one more directory with the same name (django convention) aswebsitename.This will keep all html/css/static files, etc files for your webpage.After that, you’ll need to modify the
views.pyfile (present in your App directory) where you’ll have to define the view functions which will be called using a specific URL and this function will return the response to the server.Now that you have created an App response page and associated it also with a view through the function defined in
views.py. You need to route different URLs to your different applications/logics throughurls.pyin project folder.So, now you have to create a similar
urls.pyin yourAPP_NAMEdirectory also which will be almost same as theurls.pyfile in the project directory, but thisAPP_NAME/urls.pyfile will only keep the list of all the urls in this specific app(APP_NAME) only. And then you have to link thisurls.py(of APP_NAME) to theurls.py(websitename) by simply adding a reference of app’s url file in the Project’s url file.
To make these templates files work & also the database associated with each app, you need to add the APP in the main project’s settings.py file manually in the list of INSTALLED_APPS=[ ], so that, by doing this, now django will know to look at the templates directory for files.
To add your app in the INSTALLED_APPS list, you need to add the App Configuration of your app (class name inside the apps.py file inside your app) in the INSTALLED_APPS list in the project’s settings.py file.
Example: apps.py file inside the ‘pages’ app
from django.apps import AppConfig
class PagesConfig(AppConfig):
 name = 'pages'
Here the app configuration name of your app is the name of the class. Here it is “PagesConfig” in the above example.
So, copy this class name from the apps.py file of your app, and add it inside the INSTALLED_APPS list in the settings.py file inside the main project directory.
Here you need to add the path to the app configuration of your app in this way:
INSTALLED_APPS = [
    'pages.apps.**PagesConfig',
    '<APP_NAME>.apps.<ClassName>',
 'django.contrib.admin',
]
After adding your app configuration in the main projects app list, it’ll automatically render the templates files and the database of each app.